|
|
|
Why Go Light
Shelter
Bugs
Pack
Sleeping Bag/Pad
Bag Cover
Kitchen
Water
Clothing
Rain Gear
Light
More Info
Home |
- Why go light: Because it
is more fun! You will enjoy the walk more without the heavy load. You
will find that you focus on the hike rather than getting to the destination
as quickly as possible so you can take off that heavy pack . For long
distance hikes, you will cover more miles per day, not because you hike
faster, but because you don't need to quit as early in the day.
- Disclaimer: I am talking about three season hiking
here. In the winter the rules change and you will need to carry more,
but you can still keep it light.
- Exponential Benefits: The more you reduce weight, the
more you are able to reduce weight. For example, as you cut weight in
your pack you eventually reach the point where you don't need a pack
with a heavy frame and all those extra pockets. Instead of a 7 lb. pack,
you now have a pack weighing less than a pound. Instead of a heavy pair
of hiking boots to help your feet support all that weight, you can hike
in running shoes or at least lightweight boots.
- Goals: For me the goal at first was to get my pack
weight below 15 lbs. Presently I have it down to under 10 lbs except
in winter. By pack weight I mean the weight of your pack and its contents
excluding consumables; ie. food, water, fuel, and what you are wearing.
Food should weigh about 1.5 - 2 lbs. per day so for a 5 day hike figure
8-10 lbs. of food. Water weighs 2 lbs. per liter and you will probably
carry 1-2 liters. So if your pack weight is 15 lbs. and you are carrying
11-12 lbs. of food and water, the total weight on your back is 26-27
lbs. That's enough! A pack weight over 30 lbs. begins to take the fun
out of the hike. With an 8 - 10 lb pack weight, my total weight for
a five day hike with consumables will be between 21 - 23 lbs. With this very
comfortable load I am free to truely enjoy the outdoor experience I
am having.
- General Rules (How to begin): I began making progress
on my weight goal when I did two things; first I dug out a scale that
I formally used to weigh dried herbs, and second I prepared a spreadsheet
with the weight of each item and a total that changed as I replaced
the heavy stuff with lighter versions. Without a scale you are pretty
much playing a guessing game. You could take it all to the Post Office
and weigh it there, but it is ever so much more convenient to have one
readily available. With a spreadsheet and scale you will immediatly
appreciate your gradual reductions in pack weight.
- Start with the big three; tent, pack, and sleeping
bag.With the lightest possible versions of these three items you may
save several pounds. For example, instead of 5-7 lbs. for a tent I may
use a tarp and bivy which together weigh about 10 ounces, most packs
weigh 5-7 lbs while mine weighs 21 ounces, and sleeping bags may weigh
3-4 lbs while mine weighs about 18 ounces. After these three, take a look
at your stove, cooking kit, water filter and clothing. Finally peck
away at the little items replacing or eliminating as needed. For perishable
items, estimate the amount you will need and take only that much. Don't,
for example, take a full 1 lb. jar of peanut butter for a three day
hike unless you intend to eat it all. Move these items from their original
containers to smaller, lighter ones.
- The Gear Quiz: For everything else that you are thinking
of taking, submit it to this quiz;
- do I really need it?
- If so, is it the lightest version that is available?
- Am I already taking things that can serve for more
than one function. Socks, for example, can be used as mittens,your
hikers trowel can serve as a sturdy tent state, trekking poles may
serve as tent poles, and your poncho doubles as a pack cover and
perhaps even your shelter.
|
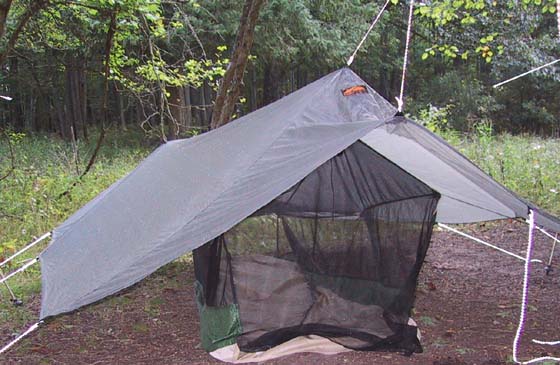
Shelter: My present shelter is a simple ultra light tarp. Actually I have tarps in
four sizes; 6' X 8', 7' X 9', a 5' X 8' tarp/poncho combination, and
a Golite Cave 1 (7' X 8.25').
I started with a 8' X 10 and that was probably good because it was large enough
to ease my concerns about getting wet etc. as I broke away from the confines
of a tent. Now I use the smaller tarps exclusively.
The most commonly used A-frame configuration
of a tarp does require some simple techniques to set it up quickly and effectively.
I have created a page where these techniques are described and illustrated.
It is called Tarp Camping 101.
Bug Protection Of course,
protection from bugs is a primary concern with an open tarp. I have tried several
different optons, all of which work quite well. So it is a matter of personal
choice depending on conditions expected during the trip. Here are some optons:
-
The Golite Nest 1 is a 2' X 7' rectangular
bug net tent that was made to fit inside the Cave and attaches to the Cave's
tie-out points. Essentially it is a tent within a tarp. It is rather heavy
at 13.5 oz. Part of this weight is because it has a floor which might be
a plus for those who really want to have a barrier between them and the
ground.. Photo Mountain Laurel Designs has an interesting net tent that is much lighter (about 5 ounces).
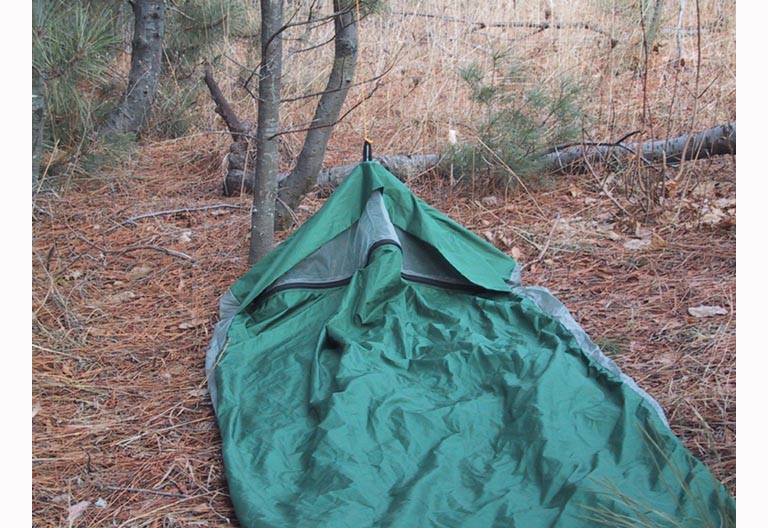
-
Bivy sack with removable netting. This is a lighter option. The netting zips for bug season or can be removed during the bug free seasons. The netting consists of a small insert at the head end of the bivy and can be extended with a line tied to your tarp. My present netted bivy weighs about 5 ounces. Photo
-
The Original
Bug Shirt, Elite Edition. At 10.1 oz. this solution adds no weight
to my pack (when I am wearing it). I gain a extra shirt for my trip and
benefit from complete bug protection anytime I have it on. This shirt is
made of high density fabric which mosquitoes and biting flies cannot penetrate.
There are ventillating side vents made of netting, and a hood which incorporates
fabric at the back and netting to cover the face. The sleeves and waist
end in a drawstring with a cordlock to seal these areas. The side vents
are large enough so they extend around to my back a bit making for uncomfortable
rubbing when I'm wearing my pack. I solved this by purchasing a Golite vest
(3.1 oz) which is cooling to wear and is more comfortable next to my skin
than the shirt fabric and netting.
The Nest is definitely the most comfortable. It has all the
advantages of both a tent and a tarp. I particularly like the fact that, while
inside in hot weather I can wear as little clothing as I wish. Unfortunately,
the Nest is also the heaviest option. I tend to choose it for short trips when
the rest of my load is light. If I'm hiking in the middle of bug season, or
on longer trips, I go with the bug shirt and/or bivy for light weight and
bug protection all day and night.
There are two other options, the first is to wear an inexpensive
bug head net as your sole protection. Outdoor Research makes a delux model that
incorporates a metal ring to keep the net off your face or you could wear a
hat with one of the cheaper alternatives. I haven't tried this because I like
to regulate my comfort level by sometimes having my arms out of the sleeping
bag, but it seems to work for some people. The second option is to simply drape
a no-see-um net over you. One hiker has described his system which consists
of finding a stick, preferably forked and about 18" long. He shoves this
into the ground near where he will place his head, then drapes a 6' X 7' piece
of net over this, tucking it in along the sides of his sleeping bag and placing
a couple of rocks at the corners near the stick.
Pack:
My pack is the 21 oz. Golite Jam2.
Golite started with a pack designed by Ray Jardine that weighed about 14 ounces (the Golite Breeze). As you can see, the pack has gotten heavier as it has evolved to the present Jam2. The changes, I believe, are worth the added weight. I do a lot of bush wacking and this pack, with all the old mesh pockets replaced with solid fabric, is strong enough to take this conditions. If you are willing to give up some features, it's possible to trim up to 4-5 ounces from the pack. I have added a shoulder strap camera case and the small Granite Gear Air Pocket for carrying my map, a snack, etc.
When packing, I wrap my ground sheet around my air mattress, roll it, then insert it into the empty pack, and push it outward to frame the inside of the pack. This serves as water proofing and padding for the items that will go inside. Next I place my sleeping bag on the bottom, working upward with food (except the lunch and snacks for that day), tarp, bivy, pot with cook stove inside it, clothing, and small items bag. If the day looks at all like rain, the raingear goes on top or in the outer back pocket.
There are other lightweight packs out there to choose from.
Golite now has a full line of lightweight packs. Mountainsmith has a couple
in their line. Other small manufactures to check out are GVP for the G4 pack
Link, and LW Gear and their 1 lb pack Link.
|
|
| The original Golite Breeze |
Index
Sleeping
Bag: The solution, I believe, to weight reduction for sleeping bags, is to remove the bottom so that the bag becomes a quilt. In cold weather, down is still the warmest way to go. For three season camping I think either down or synthetic will work well.
Sleeping Pad: Closed cell foam pads are the
lightest choice. For me, the key to comfort when using foam is to dig a hip hole. Lie
down on the pad to locate the position of your hips. Dig a hole a couple inches
deep beneath that place. Be sure to fill it in before breaking camp. A less
bulky and more comfortable choice, however, is an air mattress. I'm currently using a shoulder to hip length, trapezoidal shaped air mattress that weighs less than 10 oz. The choice is a trade off; do you
want comfort and saved space is weight savings more important. Gossamer Gear sells some of the lightest pads currently available.
Ground Cloth/Sleeping
Bag Cover: For years I used Tyvek as the layer between my foam pad
and the ground. This is the material that builders use to wrap houses. It is
lightweight, breathable, and durable. Cut the size you need, then run it through
a cycle in your cloths washer. Hang it to dry and it will be much softer and
more pliable.
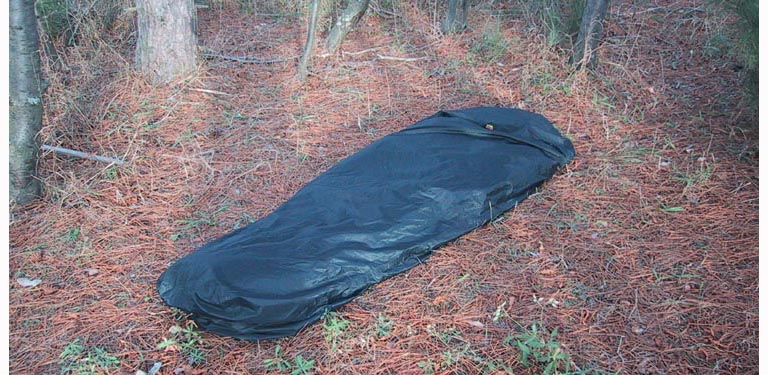
I have replaced my Tyvek ground cloth with the ultra-light polycro ground cloth from Gossamer Gear. Placed beneath my ultra-light bivy sack from Bozeman Mountain Works (Backpackinglight.com), it adds some protection for the sack. In cold weather I use Integral
Designs Pertex Endurance Bag Cover/Bivy photo.
For cold weather I prefer its simpler draw cords and hood. These allow me to
pull it tight for a snug fit around my neck so only my head is exposed. I then
take care of my head with a balaclava and the hood from the jacket that I have
worn to bed. I use the lightest weight balaclava (Polartec 100) because I can
pull it all the way over my face at night and still breathe easily through the
fabric.
Kitchen: If you read
outdoor magazines and outdoor cookbooks, many of them encourage you to cook
and eat like a gourmet on the trail. This is not the line of thinking to follow
if your plan is to go light. My kitchen set consists of a 1 L titanium pot,
a 1 L Platypus bladder with the top 2/3 trimmed to convert it to a bowl, and a Lexon spoon. With it I prepare simple but
nourishing meals. I purchased an Excalibur food dehydrator and now dry an array
of fruits, fruit leathers, vegetables, and even entire meals. For more information
go to Kitchen Tips
Water Filtration/Purification: I've pretty much gone with chemical purification. Aqua-mira and KlearWater are chlorine dioxide mixtures. Here is a description of the process with Aqua Mira:
The option that is the most hassle
free is Aqua Mira. Two solutions are combined, one containing chlorine
dioxide and the other a phosphoric acid activator. Mix 7 drops of each in the
included bottle cap, wait five minutes, pour the mixture into a liter of water,
wait 15 minutes and you are ready to drink. Oxygen bubbles up through the water
killing the anaerobic organisms. There is no aftertaste and a harmless salt
is left behind. If you encounter water with a lot of silt content, filter this through a bandana or coffee filter, or let it sit and settle
for awhile. Most Great Lakes water is pretty clear so I have not had to do this.
The two containers and enclosed liquids weigh about 3 oz. I usually pour the estimated amount that I will need into smaller, lighter containers.
KearWater does not require mixing, but does ot remain stable for as long. Keep it in the refrigerator between hikes and replace it each season.
Index
Clothing.
This is a critical concern. Proper clothing is essential because exposure is
probably the most serious threat to a hiker's safety. Most people, however,
do take too much and often choose fabrics poorly. As a general rule, except
for socks, don't take multiple changes of the same type of clothing (several
pairs of shorts or shirts, for example). Take clothing that is part of a layering
system to keep you wrm and dry over a wide temperature range.
- Clothing
Worn: Cotton is out and synthetics are in because they wick moisture
away from the skin, dry quickly and weigh less. In mild weather I wear synthetic hiking shorts, or convertible hiking pants, and, if not wearing the Original Bug Shirt, a RailRiders Eco-Mesh shirt. This shirt
which is long sleeved provides sun and insect protection, yet is extremely
well ventilated, has no snaps or buttons to fail, dries very quickly, and
is lightweight (5-6 oz). On my head I wear a Tilley LT 6 which is a full
brimmed hat with a draw string, protecting me from sun and rain. I wear a
pair of ankle height wool socks and change them a couple times per day. New Balance Trail Runners serve as hiking shoes. I
have given up completely on standard hiking boots.
- Clothing Carried: In the summer I carry
a Smartwool or silk undershirt, and Patagonia Dragonfly jacket for my upper body. This
gives me added versatility as I can wear them one at a time or together depending
on the conditions. In cooler weather I add a Bozeman Mt. Works Cocoon Pullover
which I wear while actively hiking, skiing, or snowshoeing. In cool weather
I carry long underwear bottoms.
- There is more about clothing on the tips page and the Winter
Gearlist page.
Rain Gear
- Golight Umberlla: Very handy. It slips in and out of the
outside pocket of my Jam2 Pack so I tend to use it even in a gentle rain.
If you don't put on your raingear when the rain starts, chances are that you
are going to get wet and stay wet for awhile. However, this is what many people
do because they are hoping the rain will stop and it's a bother to get out
their rainsuit. Not a problem with my umbrella. Unbrellas are not much good when bushwacking or in high wind.
- Poncho/Tarp: It is just big enough to sleep under, and doubles
as a poncho. I use the umbrella when it's raining and its time to set up camp. The version I'm currently using is from Bozeman Mt. Works and weighs about 5.5 oz.
- Integral Designs eVent Rain Jacket: This fabric is touted as the first truely breathable water proof fabric. With Golite Reed rain pants, this is a complete rain protection system.
Light:
With LED (Light emitting Diode) technology there are now some really
good choices for camp lights.
- Photon II Microlight: These little lights weigh .25 oz.They
come in various light emitting colors. I take two with me for summer hiking,
the torquoise which is the brightest but with a relatively short 10 hour battery
life, and the yellow with a 100+ hour battery life. It is just right for reading
at night. These lights are not water proof and the batteries are not as easy
to replace as the lights below. Link (review
of the different versions of this light)
- Pocket Bright: Water proof, weighs less than an ounce, various
light colors, a 100 hour battery life, and the batteries are easy to replace.Link
Headlamps:
- Petzl Tikka: A very lightweight headlamp. Including its three
AAA batteries it weights 2.4 oz. The specs read that one can expect 12 hours
of full battery life, an additional 12 hours with light bright enough for
around camp, and up to 150 hours of light bright enough to read by. This light
is not waterproof. I replaced the strap on mine with lighter cord for some weight savings.
- Petzl Zipka: Same as the Tikka but the webbing has been replaced
with retractable Spectra cord. This reduces the weight and allows you to attach
it to places other than on your head.
- There are new options appearing all the time; I won't attempt
to keep up.
Index
- More information:
Check out my three season gear list to see how all the above actually
happens. For other slants on lightweight philosophy and equipment check out
the links to other lightweight backpackers on the Connections
Page. The real center for light weight backpacking information is Backpacinglight.com The yearly subscription fee is well worth it. You'll soon be hooked :-) !!
Top | Home