MAIN L&R SPEAKERS |
DRIVERS- BOX- PLANS- CROSSOVER
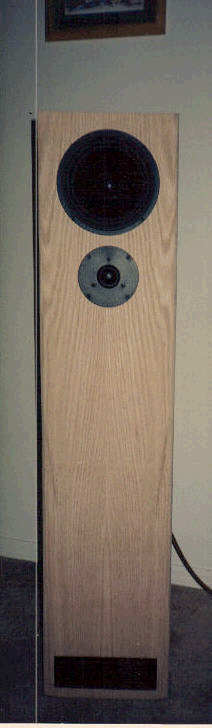
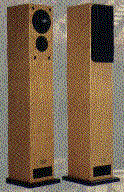
The design for my main channel speakers was taken directly from David Weem's "Great Sound Stereo Speaker Manual with Projects ". I chose this particular box due to the fact it promised to deliver a larger sound than the size of the 6.5" would lead one to believe. Also, of his other designs this one looked the best. It had a clean contemporary look. In fact, a company named Hi Fidelty Loudspeaker has a series called the Soliloquy which looks darn near identical. They are advertised as being tuned pipes. The one pictured to the right uses a 5 1/4" woofer with a 1" dome tweeter. If I didn't know any better, upon closer inspection of their print ad, I'd swear they were using Vifa woofers. Their response is 40-21khz +/-3db, sensitivity is 89db, crossover is 3.1k. The dimensions are 41"x7"x8". And now for the grand total: $2495 a pair. They also make a 8" woofer version too for only $4495! (all these numbers were taken from AUDIO magazine Oct '97 vol.81,no.10 pg.288) My project cost less than 1/10th the Soliloquy. Of course, it may not sound like $2500, they definitely sound better than $250. Using a proven design as your first project is the best money saving move you can make. Once you understand the fundamentals, then you can move on to more complex designs with more expensive drivers. All my speakers use inexpensive drivers because they are my first projects and I'd hate to blow up $200 ScanSpeak Revelators because I missed wired the crossover. I'm already dreaming up a more expensive design, can you say ribbon tweeters?
THE DRIVERS:
I chose the vifa line of drivers due to there "best bang for the buck". These drivers are seen in countless other projects on the net or in the pages of the Speaker Builder. Vifa makes drivers for OEM manufactures like: Dunlavy, Sonus Faber, and Snell. The P17WJ00 is a die cast framed, polypropylene coned, 6.5" driver.Vifa-P17WJ00
- Fs: 37hz
- SPL: 88db
- QMS: 1.55
- QES: .45
- QTS: .35
- Xmax: 4.0mm
- VAS: 1.23cu ft
- Frequency Response: 37-5000hz

In keeping with the Vifa line, I also chose a Vifa tweeter. The main reason for this particular tweeter over the many others that Vifa makes is it's low Fs. Again this tweeter has been used in many speakers systems. It's a soft silk dome tweeter with a black composite plastic face.Vifa D27TG35-06
- Fs: 650hz
- SPL: 90db
- Power: 100/140wts
- Frequency Response: 1,500-30,000

My edition of David Weem's book is about 10yrs old so many of the drivers he specified were either no longer produce or there was a name change. Nonetheless, I had ended up picking up the right drivers because in his later editions he states using the very P17WJ00 I had chosen. I knew I was on the right track.THE BOX:
The design is a transmission line(tl) speaker. A tl is a tuned pipe or labyrinth. Tuning can occur by stuffing the pipe to slow the soundwaves, choosing a length that is equal to 1/4 the resonant frequency of the driver in use, or both methods. This speaker design is extremely popular because it tunes the box to the driver's fs which tends to be lower than a closed box or vented box design. In Vance's book,"The Loudspeaker Design Cookbook" he states that the response of the transmission line lies closely with that of the closed box response to the best of his modeling tests. This means that it has good transient response with excellent low end. The draw back of this design is in the attempt to get low end performance, you must make a large box. A Fs of 40hz equates to a line of 7'1/2" (see wavelength chart)! Even if you fold the line, it's still a big box. The length acts as an acoustical filter. It attenuates the high frequencies and the backwave deflection of the cone. In order to get a shorter length stuffing was introduced to replace the length of the line. Because low frequencies aren't affected by the stuffing, the tl can deliver low end performance.
As popular as the design is with amateur builders, there really is no hard math for the design of tl's. Both vented and closed box designs have been modelled so well that software programs, especially LEAP can give very reliable responses. Unfortunately with tl's, there is no concrete math to support reliable modelling. There are some programs that attempt to model, but it is mostly taking the Fs dividing by the speed of sound and taking a 1/4 of that measurement. The problem is that when you introduce stuffing you get different speeds of sound through different stuffing materials and stuffing densities. There are to many variables. Larry Sharp of Mahogany Sound has come up with program for $10.00 that takes into account Fs, Qts, and density of fiber (actually his own fiber he sells-Acousta-stuff). I don't think I can really go into it because of copyright laws, but his lengths are substantially shorter than most stuffed lines. Another builder, John Cockcroft, has come up with his interpretations. You'll find his work in the pages of the Speaker Builder. His projects have been reproduced successfully by many. In fact he should be required reading before jumping into tl designing. The following is a list of articles that can be found in back issues of the Speaker Builder from John:
- The Octaline: A Small TL (3/87)
- The Shortline: A Hybrid TL (1/88)
- The Unline (4/88)
- The Microline (5/89)
- The Simpline (2/93)
- The B-Line: A Lowdown Sort Of A Guy (1/98)
I'm sure there are more articles by him, but this is a good start. Just by looking by the titles one can tell he likes to keep his lines short. He also uses very inexpensive drivers that would seem to defeat the purpose of even building your own system. Nonetheless, countless builders have had success with his methods. The tapered tl design of David Weem's also appeared in the pages of the Speaker Builder (2/87).The Plans:
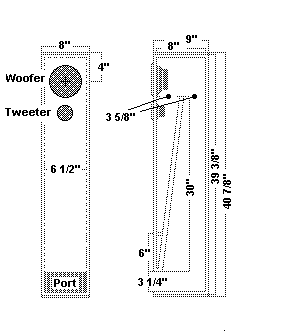
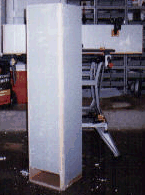
The plan shows a straight forward tower box. The inside slanting baffle gives it the tapered line. This slanting board will be the most difficult part of the construction. I laid out where the slanting board would be on both the right and left side walls. Then I used strips of 3/4"x3/4" approximately same length as the board and glued them to the side walls. Once the glue dried, I then placed the slanting board in between the strips of one wall and then brought the other wall together to sandwich the slanting board. The slanting board gives the tower its structural bracing it needs. Most closed or vented boxes require additional bracing, but because alot of tl's are labrynths, their dividing walls serve both purposes. Next is attaching the front and back sides. Go ahead and do the bottom. Leave the top off as you'll need access to the drivers and still need to put stuffing in.
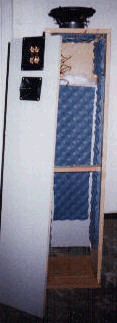
As you can see I've made some of my own changes. That blue padding is actually padding in the camping dept. for use under sleeping bags. I used it to really soak up the mid and high frequencies. Also, you can see I put a tweeter in back. I did this after reading an article in the Speaker Builder about adding ambiance to one's system. I put the terminal cup at the top so that it would re duce the wire length in the box. Now I regret that because the speaker cable outside the box is so visible now. You might also notice the small brace across the backside. I did this to give the back board an additional glueing point. I used the popular 3/4" medium density board(MFD).
 In the picture on the left you can see I used 3/4" quarter round pieces. It is said that rounding over the front edges of speakers cabinets have measureable value. Of course, you would have to have a round over on the order of at least an 1". Lyn Olson uses 1.5" round over on his Ariels. The Ariels are tl's too. Definitely read his project. The man knows his stuff. Go to Speaker Building Page , they have some articles by Olson in which he discusses woofer and tweeter selections as well as other speaker building decisions.
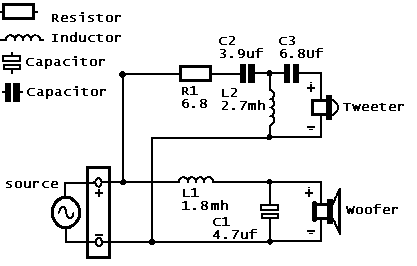
Probably the hardest part of builing a speaker system is the crossover. There are so many variables one must account for. The choice of drivers, the layout of the drivers, and ones personal tastes, all play a part in deciding. The first decision is based on the drivers you have, especially the tweeter. The crossover's first job is to protect the tweeter from the low frequency energy. It is recommended to choose a crossover point about 1.5-2 times the Fs of the tweeter. The D25TG-35 has a Fs of 650hz. So one would think 1300hz would work, but Vifa states the usable range is more like 1500hz with a 2nd order crossover. Most builders wouldn't even go that low unless they use a 4th order. The order of a crossover pertains to the number of components in the crossover circuit. A 1st order has only two elements: a capacitor for the tweeter and an inductor for the woofer. A 2nd order crossover adds another capacitor and inductor. A 3rd and 4th crossover keeps adding to it. The higher the order the more protection it adds. Of course, the trade off is that the higher the order, the more attetuation due to the signal having to pass through so many individual components before it finally gets to the driver. So ideally you would chose a driver that allows for a high crossover and then let you use a lower order crossover. Here again we run into a problem of the woofer selectioin. If we choose a tweeter that needs to be crossed over at 5khz then we would be limited to using woofers in the 5-6.5" range that wouldn't reproduce alot of low end energy. Well then, we could go with a 3-way system and use lower order crossover. Again, we would be using more parts in a 3-way than a simple 2-way. Now if that's not enough to deal with, we have to worry about how we are going to layout the drivers. For example, on my project, because the tweeter is below the woofer, it is said that a odd order(1st,3rd) crossover is needed. Also MTM or D'Appolito arrangements where the tweeter is sandwiched between two woofers, calls for an odd order crossover. There are very specific reasons why odd order is preferred, but I'm just beginning to understand them myself and the scope of it is way beyond me and this page. This is just to give you picture of what you're dealing with when it comes to crossovers. And if that weren't enough, there are two parties in the speaker world, and they agree to disagree on everything. So you will read alot of conflicting stories. To solve this problem, I took the crossover from another published project found in the pages of "Speaker Builder's Loudspeaker Projects #1" I was able to find a project that used my exact drivers. The tweeter section is 3rd order and the woofer is a 2nd order. The above diagram should be self explanatory. I didn't use the resistor, because my terminals have built in L-pads that help match tweeter to woofer sensitivity. I soldered my components together and put them on a preforated pc board. Because the terminal was so big, I was able to mount the crossover onto the backside of my terminals.