Invicta Flies - Yellow Perch
Perch are one of the pike's favorite forage fish. This pattern has the colors, marking, and wide profile (even when looking from below or above) of the natural. It is heavily weighted so you can get it down among the lake rocks where the predators patrol. Although the pattern can take some time to tie, the rewards will be well worth the effort!
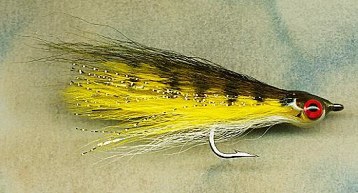
Hook: Mustad 34007, #1/0- 2/0
Thread: 3/0 waxed Monocord, olive
Eyes: 3/16 oz. brass hourglass eyes, gold
Tail: yellow saddle hackles, gold Flashabou, yellow bucktail
Body: medium chenille, golden yellow; yellow marabou
Wing: yellow saddles; bucktail in yellow, olive, and black; gold Flashabou Accent
Belly: yellow bucktail, yellow marabou, white bucktail
Head: coating of five-minute epoxy
Tying Instructions:
1) Secure thread to hook behind eye, then lash hourglass eyes on bottom of shank about two hook-eye widths behind eye. Paint the eyes red with a black pupil. Cement the thread wraps. *Note: one coat of red nail polish allows some of the gold to show through and gives the eyes a wonderful translucent sheen.
2) Bring thread to bend of hook. Tie in three yellow saddle feathers on each side, the length a full hook length beyond very edge of hook bend. The method that works best for me is measure for length, straddle two one each side of the hook, take a couple loose turns at the tie-in point (I do not clip fibers from the feathers beforehand). Position the saddles so they lean slightly toward you, then pull down with the thread, allowing the torque of the thread to move them on top. Take a couple more tight turns of thread to secure and clip the excess butts. Next, I take the remaining two saddles, flank the previous feathers with each, and tie in as normal. Generally, the first group of feathers will automatically position the final two for you. Clip the excess.
3) Clip a bundle of yellow bucktail about 1/3 matchstick in bulk, even the tips somewhat (leave several strands uneven), then tie in on the near side of the hook at the bend, on the lower side of the shank. The longest tips should extend to about a hook gap shorter than the saddles. Repeat for the far side.
4) Tie-in four strands of gold Flashabou on each side, splayed somewhat, about a hook gap shorter than saddles. Cover tie-in area with thread and cement well for durability and allow to dry. *If you are tying more than one, you can whip-finish at the bend, clip the thread, then cement. While that is drying you can tie in the tail on another.
5) Strip the fluff from the last 1/4 inch of medium chenille. Tie in at the bend by the exposed core, then bring thread forward to one and a half hook-eye widths behind hourglass eyes. Wind chenille forward tightly to the thread, tie off and clip the excess.
6) Select a full marabou feather (yellow) with long, thin fibers. Stroke the fibers back near the tip. Clip the tip off, leaving 1/8 of an inch for tying in. Tie-in by the tip with three or four turns of thread. Wind the marabou feather around the shank (should be about four full turns) laying the fibers back as you go. Wetting the marabou a little helps with this. Tie off and clip the excess. Wind the thread back over the marabou "hackle" to lay the fibers rearward and add some durability.
7) Just behind hourglass eyes, tie in four yellow saddle hackles on top of hook, length to halfway between bend and tip of tail. These should overlap the top half of the tail saddles. For these, I measure for length, trim the fibers from each side, then tie in as one, using thread torque to help position the feathers.
8) Tie in eight strands of gold Flashabou Accent on each side, extending to tip of tail. Bring thread to just in front of hourglass eyes.
9) Clip a bundle of yellow bucktail about a matchstick in diameter. Even-up only the longest tips. Tie in on top of the shank, the tips extending to just beyond the very edge of the hook bend. Clip butts at an angle and cover with thread wraps. Tie another similar bundle on the bottom of the shank, this one extending to tip of tail. Clip butts at an angle and cover with thread wraps. Work thread under these two bundle to behind hourglass eyes, take a couple turns. Lash the bundles, pulled over the eyes on top and bottom, behind hourglass eyes. Take three or four turns of thread. *Optional: apply a little head cement over the thread wraps and allow to dry.
10) Bring thread over the top of the hourglass eyes and bucktail diagonally to in front of them. Take a tight turn of thread. Tie in a small bundle of yellow marabou on underside of shank so the tips just touch the hook point. Clip excess butts.
11) Tie in a half-matchstick diameter bundle of white bucktail on the bottom of the shank, tips extending to tip of tail. Clip butts at an angle and cover with thread wraps.
12) On top of shank, tie in a bundle of olive bucktail, about a full matchstick in diameter, tips extending to just beyond tip of tail. Do not even the tip at all. Allow the fibers to splay somewhat and surround the top portion of the fly. Clip the butts at an angle and cover with thread. Cement the thread wraps well and allow to dry.
13) On top of olive bucktail, tie in a small clump (about 1/3 matchstick) of black bucktail of the same length. Clip butts and cover with thread wraps, then continue with the thread to smooth out a rounded head.
14) Whip finish and cement the thread well. Allow to dry.
15) Remove the fly from the vise and stroke the front fibers rearward. Secure about mid shank with wire. The bucktail should be tight around the hourglass eyes, and the underlying marabou should be trapping within it. Prepare the five-minute epoxy and apply around and over the hourglass eyes. Be sure it soaks into the space in the head area, and try to get the full head in one coat (with more than one coat, it is easy to get too bulky of a head). Hand rotate as epoxy sets to get an even distribution and to obtain the right shape (see photo above). When epoxy has set, but is still somewhat soft, remove the wire and pull down the belly fibers a little, again for shape. Allow epoxy to dry completely.
16) Use black permanent marker such as Pantone pens to draw in the wedge-shape stripes on the sides. Between six and eight stripes is accurate, the widest and longest about the middle along the side.
NOTES: For a Fire tiger version, substitute the olive bucktail with bright green, and the white belly with bright orange bucktail.