|
My reviewers and technical notes
NOTICE: The following procedure/reviewer contains here are all free and you can do
whatever you want with it. But I do not guarantee success or
support these actions. Any use of the information provided herein, is
performed at your own risk. You should make a backup copy of your files
prior to executing any of the following steps. Incorrect use of the
instructions can cause serious problems that may require a complete
reinstall of your operating system. I assumes no responsibility, expressed
or implied, regarding the consequences of any action taken as a result of
the information provided herein.
NAV Unable to Initialize Virus Scanning Engine Database
IE issues
Error: " The Print Spooler or one of its dependencies is not available. "
helpful sites
cd_dvd_hdd_fdd issues
how do I Start Computer in SafeMode
windows support page
how to install lexmark printer?
MS outlook issues
PRINTERS/SCANNERS/CAMERA
CDs not autorun when inserted in my CD/DVD drive in the MS Windows XP OS?
A+ Certification
Starting up and shutting down
Windows 2000 Pro Amalgamation Braindump
Network Admin_1
CDs not autorun when inserted in CD/ DVD drive in the MS Windows2000 or NT OS?
Internetworking Technologies
RAID LEVELs
Internetworking Acronyms
How do I troubleshoot a computer running Windows® 95/98 when it will not boot to the hard drive?
DVD media may not ‘Autoplay’ in Windows XP Home/Pro
Shells and stuff
X linux partitions and disk mgmnt
315 from a Millionaire
Bartleby Quotes of the Day
Vocabulary 6
Civil Service Reviewer
Internet acronyms
Vocabulary 1
Vocabulary 10
Bible quiz
DELL P1500 and S2500 Printers, Adding & setting up an optional paper tray
90-90 Diags
MSWord Tips
guide to subnetting
TCP/IP basics
having a successful job interview
 P1500; S2500 Adding & setting up an optional paper tray P1500; S2500 Adding & setting up an optional paper tray
Problem:
When adding an optional paper tray to the P1500 or S2500 printer, the Local
Printer Setup Utility (LPSU) must be run and the printer properties must be
updated.
Discussion:
If the LPSU is not run and the Printer Properties are not updated, the added
options may not function correctly or fail to be recognized.
Note: The
LPSU only functions with P1500 or S2500 printers LOCALLY connected via USB
or Parallel cables.
Solution:
After adding an option, such as a 250-sheet paper tray, perform the
following steps to ensure the tray is set up correctly. The images shown
are for the P1500, but the same process applies to the S2500.
STEP ONE, Using the LPSU:
1. Press the continue button on the printer control panel to print a
configuration page. Mid-way down in the third column, ensure the listing
for “Installed Features” lists the tray. If adding the 250-sheet tray, it
should say “250-Sheet Drawer”.
2. Run the LPSU by clicking Start >
All Programs > Dell Printers >
Dell Laser Printer P1500 (or S2500) > Dell
Local Printer Setup Utility. The message “Discovering Local
Printers. Please standby…” appears.
3. A new Window indicates “Multiple Printer Objects Found” and
lists the printers found. The first printer highlighted should be “USB00x
(or LPT1) – Dell Laser Printer P1500 (or S2500)”. Ensure the proper
selection was made, and then click OK.
4. A message “Querying the Printer for Settings. Please standby…” appears
for just a moment, and then the LPSU window opens. At the top of the list
on the left side is the item “Paper”; click this item once to
select it.
5. For “Tray 2”, select the correct Paper Size and Paper Type from the
drop-down menus. ~ie: “Paper size – Letter” and “Paper type –
Plain Paper”. See the following image:
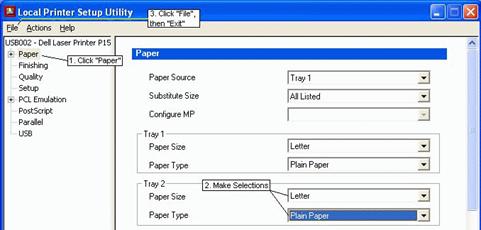
6. When
the proper settings are made for Tray 2, click
File, then click
Exit. A window appears
asking if you wish to “Apply Changes?”,
click Yes.
STEP TWO, Setting the printer properties:
1. Update the PCL driver Printer Properties by clicking
Start >
Control Panel, and
double-clicking
Printers and Faxes.
• There should be two Dell Laser Printer objects listed; one is the PCL
driver and one is the PostScript driver.
• The
PostScript driver has the PS3 suffix.
• BOTH DRIVERS
must be UPDATED for the tray to be properly configured.
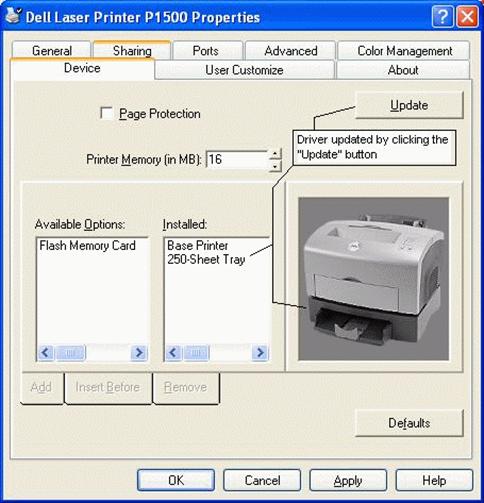
2. Right-click the first printer object “Dell Laser Printer P1500 (or S2500)” and select
Properties. After the
Printer Properties screen opens, select the
Device tab.
3. Select the “250-Sheet Tray”
then click Add, or,
click the Update
button. The image of the printer should now show the added paper tray under
the printer. Click
Apply,
then click OK. See
the following image:
4. Update the PostScript driver Printer Properties
by clicking Start > Control Panel, and
double-clicking Printers and Faxes.
5. Right-click the printer object “Dell Laser
Printer P1500 (or S2500) PS3” and select
Properties. After the Printer Properties screen opens,
select the Options tab.
6. Similar to above image, there is an
Update Now button. Click this button and note the printer options
are updated. Click Apply, then click OK.
back on top
| 


