
Fiero Headlight control (‘84-’86 mostly)
You decide to take the Fiero and run a bunch of errands in the evening. Stop to the grocery store, gas station, pharmacy then finally the video store. At each stop you turn on and off your headlights, sure enough they work like they are supposed to, until the video store! One headlight doesn’t work! First you try the switch again, and nothing happens. The only thing you see are $$$ floating by as you crawl to the dealer and drop a bunch of cash for a new motor. Well maybe some of these tips will keep some money in your pocket.
| Fiero trivia: Many people don’t know that most Fieros has a front compartment light, albeit small and mostly useless. There is a little socket for little bulb in the front compartment. It is located near the vent blower motor. The bulb is the same kind that is used on the interior floor lighting (if equipped) and the side marker lights). Any autoparts store will carry these "push-in" bulbs. So you put a bulb in, then you wonder...."where is the switch?" With the front compartment open, turn on the parking lights or headlights. The front compartment bulb should turn on. |
What is wrong with the
headlight motor?
First check the fuse!
Are both motors not working? If this is true, locate the black
Isolation Relay (shown below) on the frame of the car, NEXT TO
the driver’s side headlight mechanism. This isolation relay
controls both motors. Most likely this is the problem after
checking the fuse.
If just one motor won’t go up
and down, and it is not continually running, then make a
fist and lightly pound on the top of the headlight motor knob.
Sometimes this will get the motor operating again. Watch your
fingers, because the knob has indentations and can grab your
fingers if it suddenly turns on. (replacement motors have smooth
knobs.....maybe they realized the old design was dangerous to
fingers).
(If the motor is continually running, then you have stripped
gears, and none of these ideas will help you, sorry. You will
have to rebuild the motors, which is discussed below)
If tapping on the knob doesn’t work. Then turn off the
headlights (turn on parking lights to keep the front compartment
bulb on if needed). Next to the headlight mechanism you will see
blue wire with an inline connector. Take this connector and
unplug it. This wire controls the operation of the motor, and
when it is unhooked, the motor will not function. Now proceed to
crank up the motor by hand. When you get near to the desired
position (either up or down) you should start to feel resistance
in the motor, and shortly afterwards you will hear a faint
"click"; at this point, stop turning the motor. Be
careful when working on the motor. With the blue wire connected
the motor may turn on suddenly unexpectedly. The best thing to do
is unhook the blue wire before turning the headlight motor by
hand. Once you have the headlight in the desired position,
continue with your errands and wait for daylight to work on them.
Once back home, try reconnecting the blue wire and see if the
headlight will work. Watch out for your hands and fingers! The
headlight could suddenly go down with your fingers in the way! If
the headlight doesn’t work then disconnect the blue wire
once more. Look at the headlight mechanism. You will see black
relay on the inside portion of the entire mechanism. Each
headlight motor has a separate relay (Part number 3 in the
picture below). On the back of the relay, below the mounting
screws you will see a small metal flange, this is holding the
relay from sliding up and out. So take a small screwdriver and
bend the flange away from the relay. Slide the relay up, and then
unhook the wires. Take the relay and swap it with the good
headlight motor’s relay (from the other side of the car) and
reconnect the blue wire. If your headlight suddenly starts
working normal, then you have a bad relay. The local dealer can
get you a new one for around $20.

If swapping relays doesn’t work. Then you have a problem
inside the motor. This requires you to remove the headlight
assembly, which can be done in about 10 minutes.
Unhook all the wires from the motor and headlight bulb. With the
headlight in the up position (you may have to crank them up by
hand, a very slow process). Reach down under the headlight and at
the bottom of the assembly, you will find two 10mm nuts. Take a
small ratchet with an extension and loosen these nuts. Next crank
down the headlight and remove the two top 10mm nuts. Gently lift
out the headlight mechanism. The bottom of the headlight
mechanism has two slots for the bolts, so you don’t have to
remove the entire nut. This is very important when you have to
install the headlight mechanism. It is much easier than trying to
blindly start the bottom nuts.
With the headlight motor out remove the C-clips than hold the
motor arm (Item 4 in the picture below) to the rest of the
headlight mechanism. Remove the three 10mm screws from the side
of the motor. These long screws hold the motor to the headlight
mechanism. You may have to try a few different methods to get the
motor to separate from the headlight mechanism. If you rotate the
headlight motor knob, this will help align the motor arm, so it
is easily remove. Just think of it as a puzzle.
Once you have the motor separated from the headlight assembly,
then remove the three screws that hold the little access panel
on. There should be rubber seal between the housing and the panel
(Item 2). With the panel off, gently remove the rubber plug that
is holding the wiring down (Item 8). With the plug out, gently
lift up on the ceramic portion of the HTS switch (Item 7). It
should slid out easy.

With the switch out, see if the "brushes" are in good
shape. I had a motor that was temperamental and when I took the
switch out it was missing one of the brushes. If this happens to
you, you can solder on a old (or new) brush. Check the rest of
the switch for corrosion and such. These switches do go bad, so
you may have a faulty switch, but visually it looks good. GM
sells these (GM Part # 22038870 - about $35).
If you find a problem with the HTS switch, then fix or replace
it. Reassemble the motor and headlight assembly. With the
headlight assembly in the "up" position, place it back
in the car making sure the slots in the bottom line up with
bolts. Then tighten everything down and reconnect the wires,
leaving the blue wire for last. With your hands clear of
everything, connect the blue wire. Test the headlight. It should
work. If not, then your motor windings may be bad, or worse, you
have a short somewhere in the wires. If you have access to an
extra working motor, try and see if it works in place of the old
motor. If so, then replace the motor, keeping the old one for
parts (gears and HTS switch).
That was a general overview. What follows are some more in-depth
articles on the Fiero Headlight motor. Even if you don’t
have any problems, it sure makes for some interesting reading.
Jason Wenglikowski
Frankenmuth, Michigan
jaski@tir.com
Headlight Motors - General Information
Info - 84-86 models
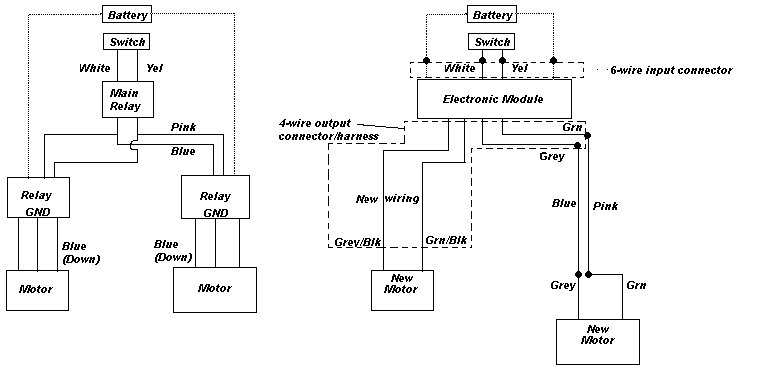
All 1984-1986 model Fieros use a similar headlight system to the
1982-1986 Firebirds. There are two motors, and three relays in
the system. Here's how it works:
Here's more than you ever wanted to know about the headlight door
circuitry for the older cars which use relays in lieu of
electronic controls. Sorry about the bandwidth, but there's no
easy way to say it. Hope it helps someone.
The headlight door motors reverse direction by reversing
polarity. However, the automatic shut off (high torque switch, or
HTS) makes that a rather more complex task than at first it might
seem.
That's because when a motor reaches its limit, one of the 'wires'
is disconnected from the motor by the HTS. Reversing the polarity
at this point wouldn't do anything since the circuit is broken by
the HTS.
Consequently, each motor has three wires which for control. The
combination of the blue wire, gray wire, and green wire provide
polarity reversal to the motor (to make it able to run in both
directions) and to run each motor from its resting state, after
it has shut off.
There are of course two motors. They operate and are controlled
identically.
Here's the matrix:
RIGHT HAND MOTOR
| ------Blu---Grn---Gry up: -------(+)------(-) dn: (+)---(-) |
That is, in order to run the motor
up, the system connects the green wire to the hot side and the
gray wire to ground. In order to run the motor down, the system
connects the blue wire to the hot side, and the green wire to
ground.
The left hand motor operates the same, except for its blue wire
is actually blue with white stripes.
There is an actuator relay for each light mounted on the body of
the light housing. There is also an isolator relay, mounted on
the fender wall on the driver's side. When operating properly,
the two actuator relays act identically.
The actuator relays get their instructions from the isolation
relay. When the motors need to run down, the isolation relay is
not energized, the blue (and blue/white) wires make with the hot
side through the closed contacts of the isolation relay (which is
not energized), and the ground is furnished to the motor through
the closed contacts of the actuator relay until the circuit is
broken by the HTS. When operating properly, neither the motors
nor the relays draw any current in the full down position.
When it's time to go up, the actuator relays are energized when
the pink wires coming from the isolation relay are connected to
the hot side through the newly closed contacts of the isolation
relay, the isolation relay is energized because the yellow wire
coming from the head light switch is now hot. When the actuator
relays are energized, they furnish 12v from the always hot red
wires, through their newly closed contacts, to the green wire.
The motor is grounded through the newly closed contacts of the
actuator relays. The motors will run up until the circuit is
broken by the HTS. When operating properly, with the light doors
in the full up position, all relays are energized and draw
current, but the motors do not.
There are very counterintuitive things about this circuitry: When
the motors are running UP, both the hot side and the ground are
furnished by and through the actuator relay. However, when the
motors are running DOWN, only the ground is furnished by the
actuator relay because the blue and blue/white wires do not run
to or through the actuator relay.
Similarly counterintuitive, when the motors are running down, the
hot side is supplied by and through the isolation relay, but when
they are running up, the hot side is supplied not by and through
the isolation relay, but through the always hot fusible link.
That's how the headlamp door relays and motors work. The relays
are not cheap: $17 ea for the actuator relays and $25 for the
isolation relay. Proper trouble shooting can save a buck or two.
It is fairly easy to swap the actuator relays from side to side.
If the symptoms change with them, than its probably the relays.
Although the actuator relays look similar to the isolation relay,
they are very different, they cannot be swapped. Please not that
the system is very interdependent, and it's easy to see why
Pontiac changed to electronic (as opposed to electro-mechanical)
controls.
Harold
halmc1@worldnet.att.net
Info - 87-88 models
The 1987-1988 Fieros use a new headlight system, which is also
used in 1987 and later Firebirds. This system has two motors and
an electronic module which controls their operation. Here's how
it works:
There are only two wires connected on each motor. Green(/black)
and grey(black), and they connect to the output (4-pin connector)
on the headlight control module. The other connector (5-pin) on
the module is the inputs. The two red wires are the continuous
power from the battery through two fusible links, as in the 84-86
system. The white and yellow wires from the headlight switch are
also the same, as is the ground.
Everything on this system is done inside that little electronic
control module. When the headlight switch is on, it tries to run
the headlight motors in the up direction. When it is off, it
tries to run them in the down position. Rather than having
separate wires for each (and ground), as the previous system did,
this one reverses the flow of current across the wires to turn
the motor in the opposite direction. Also, rather than having an
internal limit switch inside the motor, the control module
actually senses the current being used by the headlights. When
there is a sudden rise in current draw, as happens when the
motors can no longer turn, the module shuts off the power to the
motors.
Internally, the main difference between the new motors and the
old ones (other than the fact that the current sensing mechanism
is now located in the control module rather than the motor), is
that the new ones are designed so that rather than stripping out
the gears that drive the motor, they have a bushing which will
break. They are bolted together, rather than riveted like the
older ones, so that this bushing can be easily replaced.
"Sketch"
sketch@apollo.pacificweb.net
(Space Coast Fieros - Florida)
Headlight Diagnostics
[Note: this is obviously intended for 84-86 models, but some of
it applies to all years.]
(From five page article in January 1990 Super Automotive Service)
•Both doors wont close:
•Blown Taillight fuse (20 amp) •Bad isolation relay
•Bad connection or ground
•One door wont close:
•Bad actuator relay
•Bad isolation relay
•Bad connection or ground Faulty actuator motor limit switch
•Bad actuator motor
•Both doors wont open:
•Blown main fuse link to headlight switch
•Bad isolation relay
•Bad connection or ground
•One door wont open:
•Bad actuator relay
•Blown actuator relay fusible link
•Bad connection or ground Faulty actuator motor limit switch
•Bad actuator motor
Scott Backer
sbacker@vivanet.net
Testing - ‘84-‘86 models
If the headlight motor (actuator) KEEPS RUNNING, it's the
actuator - or more precisely, a worn out gear on the clutch
mechanism at the bottom of the actuator. New actuators cost
$160/each (list). The right one (on an 84) is GM Part # 22039673
and the left one is GM Part # 22039672. You might be able to find
a used one at a junk yard for $50-$75. But I would spend the
money and get a new one. This way you won't have to worry about
it for quite a while. If you are mechanically inclined you should
be able to change one in 30 minutes with just a couple of sockets
(13mm for headlight assembly nuts and a 10 mm for the long
actuator to headlight assembly bolts). Just remember to
disconnect power first and crank the actuator up and down by
hand. Remove the entire assembly (4 nuts), then remove the
actuator (3 LONG screws and one nut on the lever arm).
Installation is just the reverse.
If the motor NEVER comes on, I'd say it could be either a bad
relay or the motor brush/switch assembly is dirty or shot (this
can be replaced separately. It's GM Part # 22038870 - list is
about $30). If the motor doesn't come on (won't go up/down) I'd
try this:
1.turn the lights on to try to bring the headlight up. 2.With the
light switch still in the on position, open the hood and bring
the defective headlight up by hand by turning the knob on top of
the actuator. Don't force it. It should turn pretty easily. The
action of turning the shaft might be enough to get it started.
3.If 1 & 2 fail, try swapping the right and left headlight
relays. BE CAREFULL! There are three relays used for headlight
operation. There is an isolation relay mounted on the left
cowling, and two headlight relays. The right headlight relay is
mounted just to the left (inboard) of the right headlight
assembly (between the headlight and the coolant overflow bottle).
The left headlight relay is mounted just to the right (inboard)
of the left headlight assembly. DON'T swap a headlight relay with
the isolation relay (which is mounted to the left (outside) of
the left headlight assembly. If you swap headlight relays and the
problem switches sides, it's the relay.
If this doesn't fix your problem you either have a bad wire
(really unlikely looking at the schematics), bad actuator motor
(burned out contacts or winding), or bad isolation relay.
Bill Salina
73605.272@compuserve.com
Repair/Replacement
On the 84-86's, the gear becomes stripped, but Alan Moody in
Florida who makes replacement gears out of brass which he sells
for $50 each. (Phone number: 407-275-5040). Bart Waclawik
makes an exact replacement gear for $20 each. You can find
out more here http://members.tripod.com/~Bart_Waclawik/gears.html or contact Bart at waclawib@wabash.edu
On the 87-88 system, there is a bushing that wears out. You can
get a rebuild kit with the bushing from Ecklers Corvette (mail
order place out of Titusville, FL. Phone number: 1-800-327-4868)
for about $5. The part number is E-29304. The Corvette headlight
motors use a similar size bushing, but you may have to sand it to
fit. Rodney Dickman sells the exact replacement
repair kit for 1987-1988 Fieros - $4.00 plus $1.00 shipping,
(414) 762-9244. Check out http://www.execpc.com/~rodney1/
"Sketch"
sketch@apollo.pacificweb.net
(Space Coast Fieros - Florida)
The 88 headlight motors had what I call shear pins in them. Tear
the motor apart and you'll see what appears to be either a
crumbled mess of plastic or in some cases a gob of goop.
That’s what happens over the years to those pins. I just
picked up enough to fix two headlights in Daytona a couple of
weeks ago at the show for $4.00. The bag includes 6 white plastic
dowels about1/2" long x7/16 diameter.(Approx. dimensions.)
Someone may know the number for the guy that sells them. I can't
find his card. But in short, your problem may be this simple fix.
$4.00 is cheap. (
Bill Welch
billspyder@aol.com
Swapping Motors
A knowledgeable proprietor of a Firebird performance scrap yard
clued me in that mid-80's (82-86) Firebird headlight motors are
interchangeable with early Fiero headlight motors (84-86) with
one note:
the right and left motors are switched ie. the driver's side
motor on a Firebird matches the passenger side motor on a Fiero.
I cannibalized the Firebird motors for their gears and they work
perfectly. If you do likewise, replace both gears -- not just the
broken gear -- as there are differences in gear pattern. The
Firebird motors appear to be entirely interchangeable with the
Fiero motors, but they need to be internally inspected and
re-greased to ensure they aren't subject to the same grease
coagulation / broken gear problem as the Fiero motors you're
replacing.
As there are so many more Firebirds out there, parts may be more
available and less expensive then Fieros.
Terry Leftgoff
76371.310@compuserve.com
(c/o Nick Varetakis)
If you find and 87 or 88 Fiero in a junkyard, you can
(relatively) easily convert your headlights over to the new
system. This requires changing the entire front wiring harness.
Remove it where it connects to the bulkhead near the power brake
booster, and disconnect the wires from the windshield washer
pump. Move to the front (headlight area), and you will have to
remove a lot of wire holders, and electrical connectors on all of
the lights and the coolant fan motor. Remove the headlight
motors, and the control module, which is located on the outside
of the frame, just below the driver's side front marker light (in
front of the wheel well). You will also need the coolant fan
relay (in front of the driver's side headlight), because it has a
different connector from the one used on older Fieros. Now take
all of that, and put it in your car. Instant (well, almost) 87-88
style headlights.
On the other hand, if you're handy with a soldering iron, you
could just take the motors and control module, and wire it up to
your existing system. If you do this, you could use the motors
and control module from an 87 or later Firebird instead (may be
easier to find).
I did this on my car, and here is the schematic for the headlight
wiring which is now on my car. The original wiring is on the
left, and the new wiring is on the right. The "dots"
are the points at which I soldered the wires together.
"Sketch"
sketch@apollo.pacificweb.net
(Space Coast Fieros - Florida)
How to save wear and tear on the headlight motors
So now your headlights are working properly again, whew! How can
you help preserve their life.
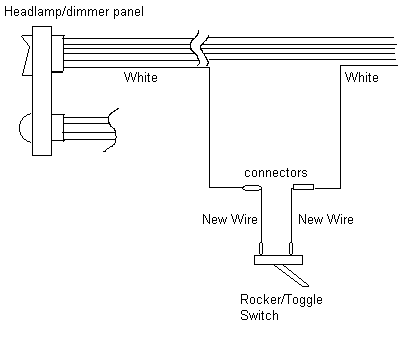
The easiest thing to do is put an in-line switch to control the
headlight motors. The second life saving procedure is to regrease
the headlight gears. Since the switch is easy, I will explain it
first. Run down to your favorite electronics supply store (ie.
Radio Shack , Autoparts store) and purchase a "on/off"
rocker switch, your choice of design, and some 18 gauge wire (I
believe that is close to the size. You may want to double check
the size with what GM uses for the headlight switch). Get about 3
feet of wire....heck, get a roll of it! Remove the headlight
switch/dimmer control panel from the dash (4 torx screws). Now
remove the trim plate that is located under the steering column
(4 hex head screws). Gently remove this trim. Take the headlight
switch and unplug the harness from it. On that harness you will
see a white wire. Cut the wire and attach some quick connectors,
one male, the other female (that way if you remove the switch,
you can just hook the wires back together). Now take your switch
and find a nice place where you would like it and then cut two
pieces of wire to the appropriate length.
Put the corresponding connectors on each end of the two pieces of
wire. Now plug the white wire into your new wire, then plug this
wire into the switch. Run your other new wire from the switch to
the other half of the white wire. You now have an inline switch.
Now test out your switch. Turn your headlights on. They should go
up. Now turn them off. If they stay up your switch is in the
"open position". Make a mental note of this. Now flip
the switch and the headlights will go down - your switch is now
in the "closed position". (if your headlights
don’t stay up , then try it again with your switch flipped).
With your switch in the "closed position" your
headlights will operate like normal. However, if you put your
switch in the "open position" then when you turn on
your headlights they will open, but when you turn them off, they
will stay up. To lower them, simply flip your switch to the
"closed position". Simple eh?
To finish up the installation, unplug the connectors from the
toggle switch. Run the wires down inside the opening where the
headlight/dimmer panel was. You will see a small hole back there
and with the bottom trim panel off you can reach the wires. Now
run the wires to the location you desire and install the switch.
Replace the trim panel below the steering wheel, this will cover
the wires. Use electrical tape and wrap up the connectors.
Replace the headlight/dimmer switch panel and you are all done.
Now when you stop for gas, you don’t have to put your
headlight motors down, just flip your new switch to the
"open position" and turn off the headlights like
normal. You can leave them this way all winter if you so desire.
It doesn’t matter to the headlight motor which position it
is in.
Here is what Ron Dittmer (dittmer@pcs.mot.com) had to say about
the switch
"I got a small black rocker switch which measured just over
1/2" square, and mounted it just to the left of the
instrumentation dimmer switch, on that front plate. Try finding a
flush mounted switch small enough and black in color, in a rocker
style, rather than the typical lever style. Radio Shack does not
offer the style that I used which looks factory original. DigiKey
at 1-800-344-4539 has one for $7.32, part number CKN2002-ND, from
C&K Components Inc. part no. U11J51ZQE22."
Regreasing the gears
Dick Wiberg has talked about this subject before, but I thought I
would cover it again. On the ’84 - ’86 motors the main
cause of problems is stripped gears. The grease GM used tends to
harden over time and does more damage than good. To fix this you
have to open the headlight motor case. You will need a drill and
drill bits, some silicone glue, sheet metal screws, large
screwdriver and your favorite grease. White grease is easy to get
and inexpensive. I have used wheel bearing grease and it worked
fine. Once you have the headlight motor off the assembly. Try and
remove the arm that is attached to the motor, you may or may not
be able to loosen the nut, you will have a better chance at
holding the gears once you open the case. Drill out the rivets
and pry open the case with a screwdriver or something similar.
Work your way around because the case is glued shut. Once you
have the case open, you will see the gears. If they are stripped
you will have to replace them (GM does not sell replacement
gears, but old Firebird and Fiero motors are a good source for
parts). If the arm is still attached to the shaft of the motor,
get a pair of vise-grips and clamp on the flat metal flange
(above the green "bumper" material of the gear) of the
largest gear Now you should be able to loosen the nut and wiggle
off the arm. Be careful not to ruin the gears or the smooth shaft
of the gears; only clamp on to the flat metal flange. The gears
should come out with the wiggling. There is an o-ring on the
outside of the case, below the arm that you just removed.
Don’t loose that, it keeps moisture out. Otherwise you are
free to remove the gears and clean and regrease them. Watch out
for the actual motor windings. Take a good look at them before
working on the motor, incase you move the motor. You can’t
hurt the motor, but it needs to be put back into place correctly
for it to work. Finish repacking the gears and apply a SMALL bead
of silicone glue the groove of the case and put the case back
together, making sure all the rubber seal, under the knob, is
aligned. Use your sheet metal screws to re-secure the case. And
assemble it back into the car. You may have to rotate the knob on
top of the motor to get everything back together. When
re-connecting the wires, keep your fingers clear because the
motor may be half way in a cycle when you connect the blue wire.
If it would be helpful, maybe we can have a tech session on this
sometime. I would be happy to show everyone what I found, or if
Dick Wiberg is willing he could show people at one of the monthly
meetings.
Special thanx to the Michigan Fiero Club for this document
